Ever tried baking something special, only to feel weighed down by complicated steps or hard-to-find ingredients? I’ve been there. Whether you’re avoiding gluten, simplifying your pantry, or just craving a cozy homemade treat, this recipe is your answer. Let’s talk about how one bowl and a handful of ingredients can create magic.
Traditional recipes often demand multiple mixing steps or specialty flours. Not here. This method skips the fuss while delivering a golden, crumbly texture that’s moist but never dense. You’ll use basic tools—like a sturdy mixing bowl and standard measuring cups—to whip up a batch quickly. Best of all? No flour means no compromise on flavor.
Think of it as your back-pocket solution for last-minute gatherings or weeknight dinners. The process is forgiving, even if baking isn’t your forte. Just combine, stir, and bake. In under 30 minutes, you’ll have a warm, aromatic dish ready to pair with chili, soup, or a drizzle of honey.
Key Takeaways
- One-bowl simplicity reduces cleanup and speeds up prep time.
- Gluten-free ingredients ensure everyone can enjoy this classic comfort food.
- Proper measuring tools guarantee the ideal texture every time.
- Bake in a standard muffin tin for easy portion control.
- No flour means fewer ingredients without sacrificing taste or moisture.
Introduction to Flourless Cornbread
Imagine whipping up a comforting dish with minimal cleanup and maximum flavor. Flourless recipes aren’t just trends—they’re practical solutions for modern kitchens. By focusing on whole, uncomplicated ingredients, you skip the guesswork and create something everyone can enjoy.
Understanding the Gluten-Free Advantage
Ditching traditional flour doesn’t mean sacrificing taste or texture. This approach skips wheat-based components entirely, relying on cornmeal as the star. You avoid common allergens while keeping the texture light and crumbly. It’s a win for those with sensitivities—or anyone prioritizing cleaner eating.
Baking powder steps in as the leavening hero here. Unlike recipes that demand precise flour blends, this method uses simple chemistry. The result? A golden rise without dense, gummy layers. Plus, you’ll sidestep the dryness often linked to gluten-free alternatives.
Embracing Simple One-Bowl Techniques
One bowl means fewer dishes and faster prep. Just combine your dry ingredients first, then stir in wet ones until just mixed. Overworking the batter is the only real pitfall—keep it gentle for tender results.
Prepping your pan matters too. A quick grease ensures easy release, whether you’re using a classic square dish or muffin tins. This recipe adapts to whatever bakeware you have, making it ideal for impromptu dinners or meal prep mornings.
Essential Ingredients for Perfect Cornbread
What separates good recipes from great ones? It’s not fancy gadgets—it’s knowing your core components. Every element here works in harmony to deliver that rustic crumble and golden finish you crave.
Cornmeal and Its Role in Texture
High-quality cornmeal is non-negotiable. Opt for medium-grind varieties—they balance grit and tenderness. Finer options can make your dish too dense, while coarse types risk a sandy mouthfeel. The right cornmeal ensures a satisfying bite without dryness.
Store it in an airtight container to preserve freshness. Stale cornmeal loses its nutty aroma, which directly impacts flavor. For extra depth, lightly toast it in a dry pan before mixing.
Key Leavening Agents and Dairy Alternatives
Baking powder lifts the batter, creating airy pockets. Too little? Flat results. Too much? Bitter aftertaste. Measure precisely—1½ teaspoons per cup of cornmeal works best.
Dairy activates the leavening. Buttermilk’s acidity boosts rise, while almond milk keeps things light. For vegan versions, swap butter with coconut oil. Just ensure liquids are room temperature to prevent clumping.
- Gluten free cornbread thrives on simplicity: cornmeal, baking powder, salt, eggs, and dairy.
- Mix dry ingredients first to evenly distribute leaveners.
- Test batter consistency—it should pour slowly but not stick to the bowl.
Tools and Equipment You’ll Need
Great recipes start with the right tools. Even simple dishes benefit from quality bakeware that ensures consistent results. For gluten-free recipes, equipment choices matter even more—they influence texture, rise, and ease of serving.
Selecting Bakeware for Optimal Results
Your pan or muffin tin directly affects how heat circulates. Metal pans conduct heat evenly, creating golden edges. Silicone options are flexible but may require longer baking times. Always preheat your oven to 400°F—this jumpstarts the rise for a fluffy interior.
Non-stick surfaces simplify cleanup, especially for gluten-free batters. Lightly grease traditional pans with oil or butter to prevent sticking. For muffins, fill each tin two-thirds full to allow room for expansion without overflow.
- Metal muffin tins: Ideal for crisp edges and quick heat transfer.
- Silicone pans: Bendable for easy removal but may need a baking sheet underneath.
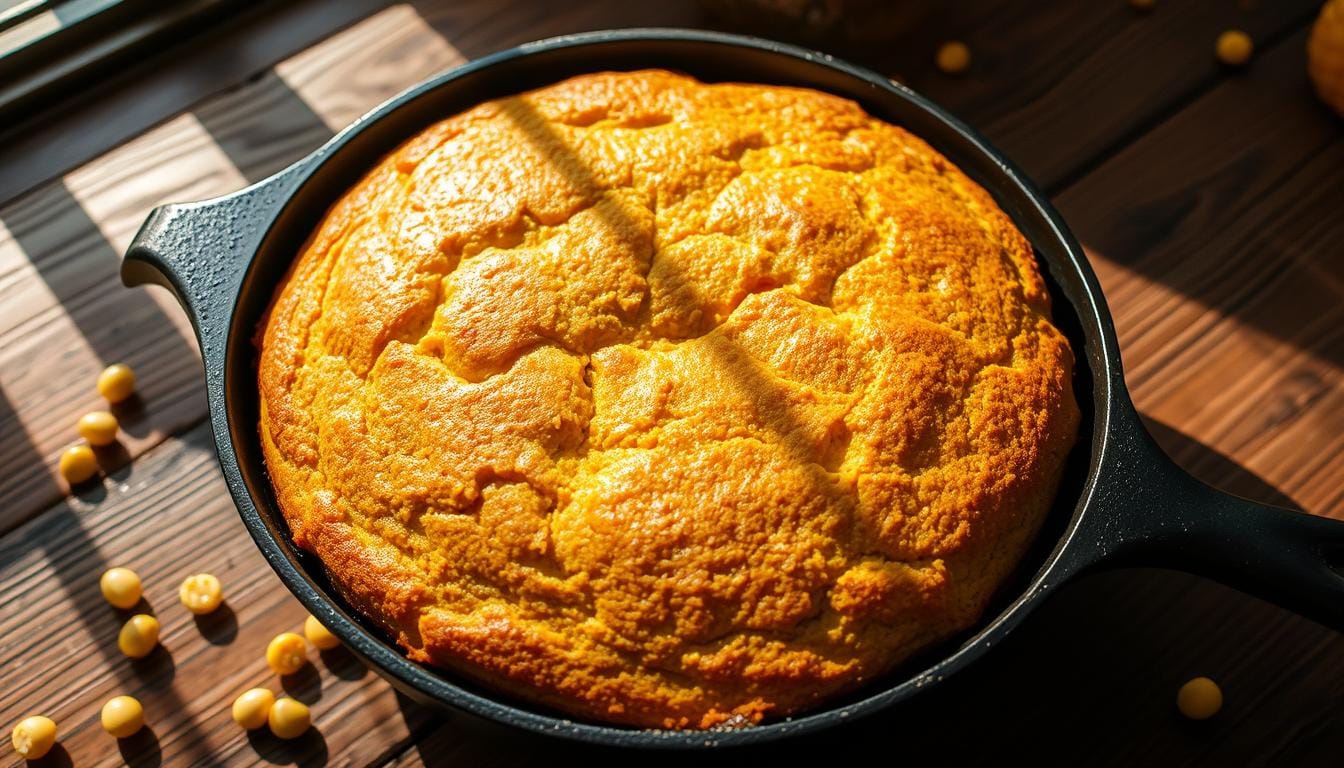
- Cast iron skillets: Retain heat well but adjust baking time by 5-7 minutes.
Cleaning matters too. Avoid abrasive scrubbers on non-stick surfaces—opt for soft sponges. Proper care extends your bakeware’s lifespan, ensuring reliable results batch after batch.
How to Make Cornbread Muffins Without Flour
Perfecting the mix of ingredients transforms simple components into a golden, tender treat. The secret lies in balancing textures and flavors while keeping prep effortless. Let’s break down the steps to create a batter that bakes into fluffy, crowd-pleasing results every time.
Mixing Dry and Wet Ingredients Properly
Start by whisking dry ingredients in a large bowl. Combine cornmeal, a pinch of salt, and baking soda. These form the foundation of your batter. Measure precisely—using a leveled cup ensures consistency.
Next, pour in wet components like milk, eggs, and melted butter. Stir gently until just combined. Overmixing activates excess gluten-free starches, leading to a crumbly texture. Aim for a few lumps remaining—they’ll dissolve during baking.
| Ingredient | Role | Tip |
|---|---|---|
| Cornmeal | Base texture | Use medium grind |
| Baking Soda | Leavening agent | Mix with acidic dairy |
| Sugar | Flavor balance | 1-2 tbsp max |
A touch of sugar enhances the natural sweetness of corn without overpowering it. Fold in whole kernels for bursts of flavor. Keep the batter slightly thick—it should drop slowly from a spoon.
Finally, bake immediately after mixing. Delaying lets leaveners lose potency, affecting rise. This method guarantees airy, gluten-free muffins with a crisp crust and moist center.
Step-by-Step Mixing and Baking Process
Getting the texture just right starts with smart ingredient interactions. Unlike traditional methods, this gluten-free recipe relies on precise timing to activate leaveners and lock in moisture. Let’s walk through each stage to ensure golden perfection.
Activating the Baking Soda with Dairy
Begin by preheating your oven to 400°F. This ensures even heat distribution from the moment your pan hits the rack. In a large bowl, whisk cornmeal, baking soda, and salt. The magic happens when you pour in buttermilk or dairy alternatives—their acidity instantly reacts with baking soda, creating air bubbles for lift.
Add melted butter last. Its richness coats the dry ingredients, preventing a gritty texture. Stir until just combined—overmixing deflates those crucial air pockets. Pour the batter into a greased 8-inch pan immediately. Waiting lets the leavening power fade.
Bake for 18-22 minutes. Test doneness by inserting a toothpick into the center—it should emerge clean with a few crumbs. Cool for 5 minutes before slicing. “The steam trapped inside continues cooking the edges,” notes one baking enthusiast, “giving you that ideal balance of crisp and tender.”
- Preheat oven first to maintain consistent temperature.
- Combine dairy and baking soda quickly to maximize rise.
- Use room-temperature butter for smoother blending.
Adapting the Recipe for Different Bakeware
Choosing the right pan isn’t just about shape—it’s about texture and timing. Your gluten-free batter behaves differently in varied bakeware, but simple tweaks ensure success. Let’s explore how to adjust prep and bake minutes for two popular options.

Using a Cast Iron Skillet for Crispy Edges
Preheat your skillet in the oven while mixing the batter. This creates instant sizzle when you pour it in, locking in moisture while crisping the edges. Bake at 400°F for 20-25 minutes—5 minutes longer than standard pans. Check doneness when a toothpick comes clean with minimal crumbs.
Baking in a 9×13 Pan for Family-Sized Portions
Spread the batter evenly in the larger pan to prevent uneven rising. Reduce bake minutes to 15-18 since the thinner layer cooks faster. “A light grease ensures easy slicing,” advises a home baker. Test the center with a skewer before removing it from the oven.
- Metal vs. glass: Add 3-5 bake minutes for glass pans due to slower heat absorption.
- Batter consistency: Thin it slightly with 1-2 tbsp milk for larger pans to aid spreading.
- Portion control: Cut the 9×13 batch into 12 squares for serving sizes matching standard muffins.
Your gluten-free recipe adapts effortlessly. Whether you crave skillet-crisped crusts or need to feed a crowd, these adjustments guarantee golden results every time.
Tips for Enhancing Flavor and Texture
Transform your next batch from simple to spectacular with a few clever tweaks. Balancing sweetness and richness turns basic recipes into memorable dishes. Whether you prefer subtle hints of honey or crave buttery indulgence, these adjustments work seamlessly with gluten-free ingredients.
Sweetness Meets Savory Balance
Drizzle warm honey over freshly baked portions for glossy sweetness that seeps into every crumb. Pair it with melted butter brushed on top—this duo creates a caramelized crust while keeping the interior tender. “A teaspoon of honey per slice elevates it from side dish to centerpiece,” says a chef specializing in gluten-free cuisine.
Adjust sugar levels carefully. Reduce it by half for savory meals or add a tablespoon for brunch-friendly batches. Baking powder also plays a role—too little leaves the texture dense, while a pinch extra adds lift without altering flavor.
For visual appeal, sprinkle coarse salt over honey-glazed tops. The contrast highlights natural corn flavors and reinforces the gluten-free integrity. Experiment with infused butters—like rosemary or chili-lime—to personalize each serving without complicating the base recipe.
Remember: small changes yield big results. Swap dairy butter for coconut oil in vegan versions, or fold in fresh herbs before baking. Your creativity shapes this versatile dish into something uniquely yours.
Variations and Customizations
Personalizing your recipe doesn’t mean starting from scratch—it’s about smart swaps and creative boosts. Whether you’re catering to dietary restrictions or craving bold flavors, this gluten-free base adapts effortlessly. Trusted brands like Bob’s Red Mill ensure consistency, while simple tweaks let you craft unique results every time.

Hidden Veggie Power-Ups
Add finely shredded zucchini to the batter for moisture and nutrients. Squeeze out excess liquid first to prevent sogginess. A half-cup blends seamlessly, offering subtle sweetness without altering texture. “It’s a game-changer for picky eaters,” shares a mom who regularly uses this trick.
Dairy-Free & Egg-Free Swaps
Replace buttermilk with almond milk mixed with 1 tsp lemon juice. For eggs, try flax eggs (1 tbsp ground flax + 3 tbsp water per egg). Vegan butter or coconut oil works in place of dairy butter. These changes let you make gluten-free options that align with various needs.
| Ingredient | Purpose | Substitution |
|---|---|---|
| Zucchini | Adds moisture | ½ cup shredded |
| Almond Milk | Dairy alternative | Mix with acid |
| Flax Eggs | Binds batter | 1:3 ratio |
| BBQ Spices | Savory twist | 1 tsp smoked paprika |
For savory flair, stir in shredded chicken or a dash of BBQ seasoning. These additions pair perfectly with chili or grilled veggies. Always test batter consistency—thicker mixes may need 1-2 extra tbsp liquid.
Conclusion
Mastering a crowd-pleasing dish doesn’t require endless steps or specialty tools. This gluten free cornbread recipe proves it—combine one bowl, a few pantry staples, and 25 bake minutes for golden results. Whether using Bob’s Red Mill cornmeal or your favorite brand, precise measuring ensures a tender crumb every time.
Follow the prep guidelines: mix dry ingredients first, blend with wet ones gently, and test with a toothpick. When it comes clean, you’ve nailed the bake. The oven does the heavy lifting, transforming simple batter into a versatile side for soups, chili, or drizzled honey.
Experiment with swaps like almond milk or coconut oil. Share your twists online—tagging friends keeps the inspiration flowing. After all, great recipes thrive on creativity. Now grab your pan, preheat, and let that oven work its magic. Your next meal just got tastier.