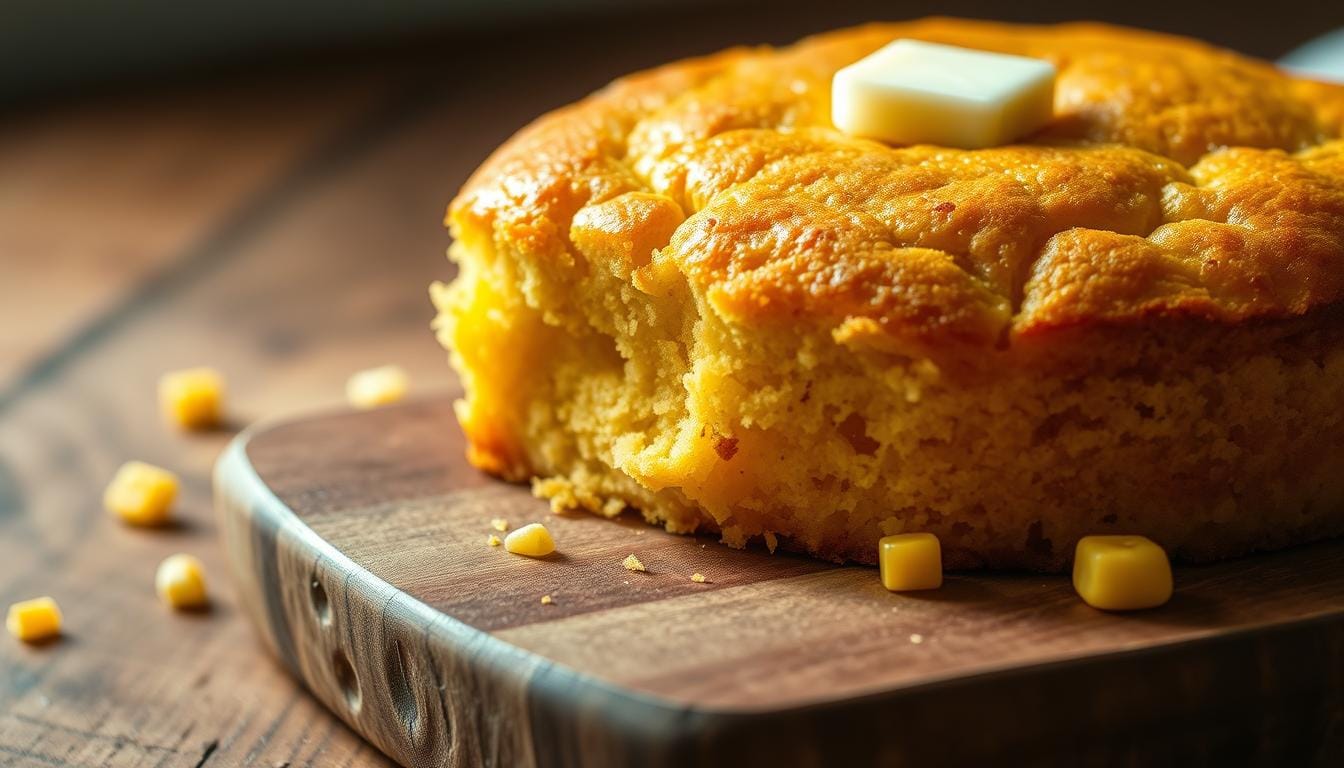
There’s something magical about pulling a golden, fragrant loaf from the oven. Maybe it’s the way the steam rises, carrying memories of family dinners or cozy Sunday mornings. Or perhaps it’s the crumbly, melt-in-your-mouth texture that feels like a warm hug. Whatever your story, this gluten free cornbread recipe is here to rewrite it—with simplicity at its core.
No need to compromise flavor for dietary needs. Using 100% cornmeal creates a naturally wholesome base, perfect for those avoiding gluten. The best part? You can customize it to fit dairy-free, egg-free, or vegan preferences without sacrificing that signature moistness. In just half an hour, you’ll have a versatile side dish or snack ready to shine.
Whether paired with chili, slathered with honey butter, or enjoyed solo, this dish adapts to your cravings. And don’t worry about complicated steps—this method skips fussy techniques. Just mix, bake, and savor.
Key Takeaways
- Ready in 30 minutes with minimal prep work
- Naturally gluten-free using 100% cornmeal
- Customizable for dairy-free, egg-free, or vegan diets
- Moist texture with a delicate crumb
- Pairs perfectly with meals or stands alone as a snack
Overview and Benefits of This Recipe
Discover how a few pantry staples can transform into a crowd favorite. This version stands out with its balance of wholesome ingredients and effortless preparation. Unlike dense alternatives, it achieves a light crumb through precise measurements and the right leavening agents.
Why You’ll Love This Gluten Free Treat
Soft, crumbly texture comes from high-quality cornmeal and a touch of honey. Baking powder ensures a fluffy rise without relying on traditional flour. The mix stays naturally light, making it ideal for those with dietary restrictions or anyone craving a healthier twist.
The Versatility of Cornbread for Any Occasion
Pair it with chili, serve alongside BBQ, or enjoy it as a midday snack. Swap dairy for plant-based milk or use flax eggs—the recipe adapts without losing moisture. Starting with a preheated oven guarantees even baking, while quality ingredients like stone-ground cornmeal elevate every bite.
Ready to explore what makes this dish shine? Let’s dive into the essentials next.
Essential Ingredients and Their Role
The foundation of any great recipe lies in its ingredients. Choosing the right components ensures your dish shines in flavor and texture. Let’s break down what makes each element vital.
Cornmeal and Flour: Building Texture
Coarsely ground yellow cornmeal is non-negotiable. It adds a rustic crunch while keeping the crumb tender. Opt for certified brands like Bob’s Red Mill to avoid cross-contamination. For flour, gluten-free blends work best—they bind without overpowering the corn’s natural sweetness.
Sweeteners and Dairy Swaps
Granulated sugar balances earthy notes, while honey locks in moisture. If you prefer less sweetness, reduce sugar by 25% without compromising structure. Baking powder? It’s the silent hero. Just 1 teaspoon lifts the batter for an airy finish.
Dairy alternatives like almond milk or coconut oil mimic butter’s richness. One baker notes: “Precision matters—measure substitutes by weight, not volume, for consistent results.” Plant-based butter keeps the crumb tender, while apple cider vinegar creates a buttermilk-like tang in nondairy versions.
| Ingredient | Role | Substitution Tip |
|---|---|---|
| Cornmeal | Base texture & flavor | Use coarse grind only |
| Flour Blend | Binding agent | 1:1 gluten-free ratio |
| Baking Powder | Leavening | No substitutions |
| Milk (dairy/nondairy) | Moisture | Unsweetened varieties |
Equipment and Preparation Essentials
Great recipes start with the right tools. Your bakeware and prep habits shape everything from texture to cooking time. Let’s explore how to set yourself up for success.
Cast Iron vs. Cake Pan: Heat Meets Texture
Cast iron skillets excel at heat retention, creating crispy edges and a golden crust in 20-25 minutes. Ideal for those who love a rustic crunch. Cake pans, however, distribute heat gently for a tender, uniform crumb. No skillet? A 9-inch square pan works perfectly.
Always preheat your oven to 375°F. This ensures even baking from the first minute. Grease your pan thoroughly—a light coat of oil prevents sticking without altering flavor. Pro tip: Place a baking sheet under thinner pans to avoid over-browning.
Use a large mixing bowl for combining ingredients. Metal or glass bowls help control temperature, while silicone spatulas scrape every bit of batter. Measure dry ingredients first, then wet—this prevents overmixing. Room-temperature eggs and dairy substitutes blend smoothly, creating a cohesive batter.
One baker shares: “Testing both pans side by side changed my game. Cast iron gives that diner-style crunch, while cake pans deliver classic comfort.” Match your tools to the texture you crave, and your next batch will shine.
Detailed Step-by-Step Instructions
Let’s transform simple ingredients into a golden masterpiece. Follow these straightforward steps to ensure your dish turns out tender and flavorful every time.
Mixing the Batter for Optimal Texture
Start by whisking 1½ cups cornmeal, 1 cup flour blend, and 1 tablespoon baking powder in a large bowl. Create a well in the center. Pour in 1 cup milk, ⅓ cup oil, and 2 eggs. Stir until just combined—overmixing leads to dense results.
Pro tip: Use a silicone spatula to scrape the bowl’s edges. This ensures no dry pockets remain without agitating the batter too much. A few lumps are normal and will vanish during baking.
| Step | Action | Key Tip |
|---|---|---|
| 1 | Preheat oven | 375°F for even heat |
| 2 | Combine dry ingredients | Whisk thoroughly |
| 3 | Mix wet ingredients | Pour into center well |
| 4 | Fold batter | Stop at 10 strokes |
Achieving the Perfect Bake
Pour the batter into a greased 9-inch pan. Bake for 18-22 minutes. At 18 minutes, insert a toothpick into the center. If it comes out clean, it’s done. If not, check every 60 seconds.
Let it cool for 5 minutes before slicing. This rest period helps the crumb set. One tester noted: “Timing is everything—set multiple alarms to avoid over-browning.”
Gluten Free Cornbread: Tips for Perfect Texture
Mastering the perfect slice starts with understanding how ingredients interact. Small adjustments in technique can elevate your results from good to restaurant-quality every time.
Ensuring a Light and Moist Crumb
Always use room-temperature ingredients. Cold eggs or milk create uneven mixing, leading to dense spots. One baker swears: “Letting dairy substitutes sit out for 15 minutes transformed my crumb structure.”
Swap 50% of cornmeal with corn flour for silkier results. This tweak enhances mouthfeel while keeping the bread’s signature rustic charm. Balance sweeteners carefully—too much honey creates gumminess, while insufficient sugar dulls flavor.
- Mix batter 10-12 strokes max to prevent overworking
- Use unsweetened almond milk for subtle nutty notes
- Test doneness at 18 minutes—toothpick should come clean
Ovens vary, so adjust bake times in 90-second increments after the first check. Watch for golden edges pulling away from the pan as a visual cue. Let rest 7 minutes before slicing to lock in moisture.
Innovative Variations and Customizations
Your kitchen becomes a playground when baking this adaptable favorite. Swap components or layer flavors to match your cravings—no two batches need to taste the same.

Dairy-Free, Egg-Free, and Vegan Alternatives
Plant-based butter like Earth Balance mimics richness without dairy. For milk substitutes, unsweetened almond or oat varieties work best. One baker shares: “Chia eggs (1 tbsp chia + 3 tbsp water per egg) create perfect binding—no one notices the swap!”
Bob’s Red Mill 1:1 blend ensures consistent texture. Their gluten-free cornmeal also prevents cross-contamination worries. Commercial egg replacers? Use them at a 1:1 ratio for reliable results.
Incorporating Extra Flavor with Add-ins
Boost your recipe with mix-ins that complement the base:
- Diced jalapeños for smoky heat
- Fresh corn kernels for bursts of sweetness
- Shredded dairy-free cheese for savory depth
Keep additions under ½ cup to maintain structure. A dash of smoked paprika or rosemary elevates aroma without overpowering. Always fold extras gently to preserve the tender crumb.
These tweaks let you tailor every slice to dietary needs or flavor fantasies. Stick to the core ratios, and your creative twists will shine.
Serving Suggestions to Enhance Your Meal
The right pairing can turn a simple dish into a memorable feast. Whether you’re hosting friends or enjoying a quiet night in, this golden bake shines brightest when matched thoughtfully. Let’s explore ways to make every bite count.
Pairing with Soups, Stews, and BBQ
Slice your pan-baked creation into squares while warm. The crisp edges contrast beautifully with creamy textures. Try crumbling it over chili for added crunch or dipping it into hearty bean stews. One home cook raves: “It soaks up smoky BBQ sauces like a dream—never soggy, always satisfying.”
For breakfast, toast slices and drizzle with local honey. Serve alongside scrambled eggs or avocado slices. Sweet tooth? Top with berry compote and a dollop of coconut whipped cream.
- Savory combos: Pulled pork, collard greens, or roasted vegetables
- Sweet twists: Cinnamon-spiced apple butter or maple syrup glaze
- Texture play: Add toasted pepitas before baking for nutty crunch
Remember the golden rule: a toothpick inserted into the center should come clean. This ensures ideal moisture for absorbing sauces without falling apart. Arrange slices on a wooden board with ramekins of flavored butter for rustic charm. Your versatile side just became the meal’s star.
Storage and Reheating Best Practices
Freshly baked goods deserve careful handling to maintain their quality. Follow these guidelines to keep your creation tasting like it just left the oven.

Keeping It Fresh at Room Temperature
Cool your pan completely on a wire rack before storing. Transfer slices to an airtight bowl or container lined with parchment paper. This prevents sticking and preserves moisture for up to 3 days. Avoid plastic wrap—it traps steam, creating soggy spots.
Freezing and Reheating Tips
Slice your batch into portions before freezing. Wrap each piece in foil, then place in a freezer-safe bag. Label with the date—it stays fresh for 3 months. To reheat, preheat your oven to 325°F. Bake for 8-10 minutes until a toothpick inserted into the center comes clean.
Microwave methods work in a pinch: Place a slice on a microwave-safe plate. Cover with a damp paper towel and heat for 15-second intervals. Check after each cycle to avoid drying out.
“Freezing individual slices changed my meal prep game—no waste, just perfect portions.”
Always test reheated pieces with the toothpick method. If it emerges clean, your texture remains ideal. Store smart, and every bite tastes like day one.
Conclusion
Perfecting a crowd-pleasing side dish doesn’t require hours or complex techniques. This time-tested recipe delivers tender results every time, whether you stick to the basics or explore creative twists. Certified ingredients like Bob’s Red Mill cornmeal ensure ideal texture, while precise measurements guarantee a golden top with a moist center.
Follow the straightforward instructions—mix dry and wet components in one bowl, bake until a toothpick comes clean, and let it rest. Swap dairy with unsweetened almond milk or use flax eggs for plant-based needs. The method adapts effortlessly to your pantry staples.
Don’t hesitate to personalize your batch. Fold in jalapeños for heat, fresh herbs for aroma, or dairy-free cheese for richness. Store leftovers properly, and they’ll taste fresh for days. Ready to bake smarter? Preheat your oven, grab a cup of cornmeal, and let this versatile staple elevate your next meal.
FAQ
Can I use regular flour instead of gluten-free blends?
How do I prevent the bread from crumbling?
What dairy-free milk works best?
Can I make this recipe egg-free?
Why does my cornbread taste gritty?
How long does it stay fresh?
Can I bake this in a cast-iron skillet?
Is honey a good substitute for sugar?
Additional Resources
For those looking to try baking their own cookies, here are some helpful guides:
- Gluten Free Baking 101 – Learn essential gluten free baking techniques.
- Healthy Gluten Free Recipes – Find research-backed gluten free recipes.
- Best Gluten Free Cookie Brands – A guide to trusted gluten free cookie brands.
Gluten Free Meals: Top 15 Delicious and Celiac-Friendly Recipes
With these insights and strategies, you can confidently enjoy delicious gluten-free cookies tailored to your dietary needs and health goals.
An impressive share, I just given this onto a colleague who was doing a little analysis on this. And he in fact bought me breakfast because I found it for him.. smile. So let me reword that: Thnx for the treat! But yeah Thnkx for spending the time to discuss this, I feel strongly about it and love reading more on this topic. If possible, as you become expertise, would you mind updating your blog with more details? It is highly helpful for me. Big thumb up for this blog post!
I conceive this web site has got some really excellent info for everyone :D. “The ground that a good man treads is hallowed.” by Johann von Goethe.
Very interesting info !Perfect just what I was looking for! “If you bungle raising your children, I don’t think whatever else you do matters.” by Jacqueline Lee Bouvier Kennedy Onassis.