Picture this: You’ve just walked through the door after a hectic day. Your energy is low, but your hunger is high. What if you could create a restaurant-quality meal without the stress? This isn’t just another recipe—it’s your ticket to a flavorful, nourishing dinner that feels like a warm hug on a plate.
Perfectly cooked fish doesn’t require hours or fancy tools. With simple ingredients and a reliable oven, you’ll achieve tender, flaky results every time. Wondering how to bake salmon for the perfect texture? We’ll cover exactly that—no guesswork, just golden-edged fillets in 20 minutes.
Whether it’s a Tuesday night or a dinner party, this method adapts to your life effortlessly. We’ll guide you through selecting the freshest fillets, seasoning secrets, and timing tricks. Even if you’re new to cooking seafood, this approach ensures success from the very first try.
Key Takeaways
- 20-minute cooking time fits busy schedules
- Minimal prep with pantry-friendly ingredients
- Works for casual meals or elegant gatherings
- Flaky texture and rich flavor guaranteed
- Health-conscious option packed with nutrients
Introduction to a Quick and Delicious Salmon Recipe
Craving a meal that’s both elegant and effortless? This oven-baked creation turns ordinary evenings into something special. With just 20 minutes from prep to plate, you’ll savor tender fillets bursting with flavor—no chef skills required.
Overview of the Recipe and Its Benefits
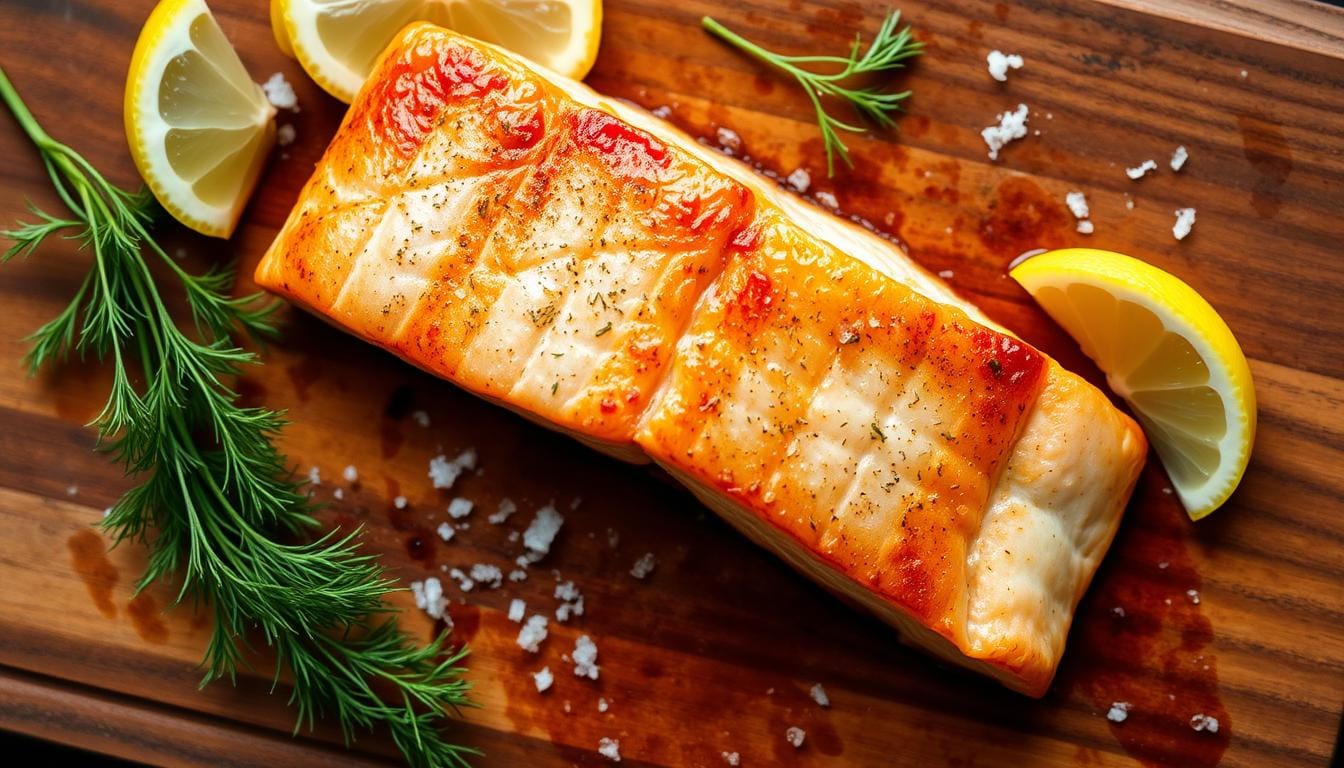
Simple ingredients like olive oil, lemon, and herbs transform fresh fillets into a vibrant dish. The oven does most of the work, locking in moisture while creating a lightly crisp exterior. Perfect for last-minute dinners or impressing guests without stress.
Why This Method Works for Busy Weeknights
Busy schedules demand meals that adapt. Whether you’re juggling work calls or soccer practice, this approach fits seamlessly. Minimal cleanup means more time to relax after eating. Plus, leftovers stay juicy for tomorrow’s lunch—if there are any!
While countless salmon recipes exist, this version prioritizes speed without sacrificing taste. Swap seasonings based on your mood or pantry stock. Either way, you’ll enjoy restaurant-quality results faster than takeout arrives.
Essential Ingredients and Seasoning
The foundation of any memorable dish starts with quality components. Your choice of elements determines whether flavors sing or fall flat. Let’s explore what transforms basic fillets into a vibrant meal.
Fresh Salmon Fillets and Alternatives
Look for fillets with firm flesh and a bright, oceanic scent. Avoid any with dull coloring or strong fishy odors. Fresh options work best, but frozen varieties can shine if thawed slowly in the fridge overnight.
Wild-caught varieties offer richer flavor, while farm-raised provides consistent texture. Both deliver excellent results when handled properly. Skin-on cuts retain moisture better during cooking.
Key Seasonings: Olive Oil, Lemon, Garlic, and Herbs
Extra virgin olive oil creates a golden crust while enhancing natural richness. Its fruity notes balance the fish’s boldness. Always opt for 100% pure varieties—they withstand high heat without bitterness.
Fresh lemon juice adds zesty brightness, cutting through the oil’s richness. Garlic’s earthy aroma deepens the flavor profile. Combine minced cloves with herbs like dill or thyme for aromatic complexity.
Seasonal herbs elevate your dish from good to extraordinary. Rosemary adds pine-like warmth in cooler months, while basil brings summer freshness. Adjust quantities based on potency—dried herbs require lighter hands than fresh.
Essential Tools and Equipment
Great meals start with the right gear. While your oven handles the heavy lifting, smart tool choices ensure golden edges and juicy centers. Let’s explore the unsung heroes of hassle-free cooking.
Choosing the Right Baking Pan or Sheet
A heavy-duty sheet pan with rolled edges prevents warping and promotes even browning. Dark metal surfaces conduct heat better than shiny ones, giving you crispier results. For smaller portions, a quarter-sheet pan fits standard ovens perfectly.
Line your pan with foil to catch drips and simplify cleanup. Add parchment paper underneath for extra non-stick insurance. This combo lets you focus on flavor, not scrubbing.
Using a Thermometer and Other Kitchen Essentials
Don’t trust guesswork—insert a digital thermometer into the thickest part of the fillet. 125°F delivers tender, flaky perfection. Remove it from heat at 120°F, as residual cooking will finish the job.
Before prep, gather these tools:
- Tongs for gentle flipping
- Microplane for zesting citrus
- Pastry brush for oil application
With these basics in place, you’ll transform simple ingredients into a standout meal. Proper tools aren’t just convenient—they’re your secret to consistent results.
Prepping Your Salmon for Perfection
The secret to mouthwatering results starts long before the oven heats up. Proper preparation ensures every bite melts in your mouth while locking in natural juices. Let’s transform your kitchen routine with science-backed methods.
Proper Thawing and Patting Dry Techniques
For frozen fish, thaw it overnight in the fridge—never at room temperature. This prevents bacterial growth and maintains texture. If pressed for time, seal the fillet in a plastic bag and submerge it in cold water for 30-minute intervals.
Patting dry is non-negotiable. Excess moisture creates steam, leading to soggy surfaces. Use paper towels to gently press both sides until no dampness remains. This step guarantees that seasoning sticks and crisp edges form.
Marinating and Even Seasoning Tips
Apply salt first—it draws out excess liquid and primes the surface for flavors. Let it sit for 10 minutes before adding other spices. For marinades, limit acidic ingredients like lemon juice to 30 minutes to avoid mushy textures.
Leave the skin intact during cooking. It acts as a natural barrier, keeping the fillet moist and preventing sticking. Rub oil directly onto the flesh side for maximum herb adhesion.
- Use kosher salt for better control
- Distribute spices from center to edges
- Marinate flesh-side up to avoid pooling
Step-by-Step Baking Instructions
Transform raw ingredients into a golden masterpiece with precision timing. Follow these foolproof steps to lock in moisture while achieving crisp edges.
Arranging for Even Cooking
Preheat your oven to 400°F—the sweet spot for quick cooking without drying. Line a sheet pan with foil, then parchment paper. Space fillets 1 inch apart, skin-side down. Uniform placement prevents overcrowding and ensures consistent heat circulation.
Crafting Flavorful Coatings
Combine 3 tablespoons melted butter with minced garlic and chopped herbs. Brush this mixture over each portion, covering all exposed flesh. For extra zest, arrange thin lemon slices across the top before heating.
Timing and Testing Techniques
Bake for 12-15 minutes depending on thickness. Check doneness by inserting a fork into the thickest part—properly cooked flesh separates easily into flakes. Let rest 3 minutes before serving to redistribute juices.
Pro Tip: Ovens vary—begin checking at 10 minutes if using convection. The internal temperature should reach 125°F for medium doneness. Adjust time slightly for thicker cuts or chilled ingredients.
how to bake salmon: Mastering the Process
Achieving restaurant-quality outcomes relies on three non-negotiable elements. These control points separate hurried attempts from intentional culinary artistry. Let’s explore what transforms good into extraordinary.

Understanding the Critical Steps
Success begins before heating your oven. Patting fillets dry creates the foundation for crisp edges. Seasoning 10 minutes ahead allows salt to penetrate deeper into the flesh.
“The difference between good and great lies in the details—temperature control separates home cooks from pros.”
Monitor internal heat like a hawk. Insert your thermometer at a 45-degree angle into the thickest section. Remove fillets at 120°F—they’ll climb to 125°F during resting. This prevents the dreaded dry texture.
| Technique | Purpose | Result |
|---|---|---|
| Preheated oven | Instant sear | Locked-in juices |
| Even spacing | Consistent heat flow | Uniform doneness |
| 3-minute rest | Juice redistribution | Moist flakes |
Small adjustments create big impacts. Try brushing honey on the flesh side during the last 3 minutes for caramelized edges. Or mix smoked paprika with your salt rub for earthy depth.
Trust the method, then make it yours. Once you’ve mastered these essentials, variations become exciting experiments rather than risks. Your next attempt might become your signature dish.
Flavor Variations and Enhancements
Want to transform your go-to dish into something new? Customizing flavors lets you reinvent meals without changing your trusted method. A few ingredient swaps can take your creation from Mediterranean zest to cozy herb-infused comfort.
Lemon Garlic vs. Butter Herb Options
Lemon garlic lovers get bright, tangy notes perfect for summer evenings. Combine fresh citrus juice with minced cloves and cracked black pepper. For richer tastes, blend melted butter with rosemary and thyme—this creates a velvety herb crust.
| Technique | Flavor Profile | Pairing |
|---|---|---|
| Lemon + garlic | Zesty & aromatic | Quinoa salads |
| Butter + herbs | Creamy & earthy | Mashed potatoes |
| Chili + honey | Sweet heat | Grilled veggies |
Optional Additions: Honey, Chili, and Extra Herbs
Drizzle honey during the last 3 minutes of cooking for caramelized edges. Add red pepper flakes to your garlic rub for subtle warmth. Mix cilantro with lime juice instead of lemon for tropical flair.
Fresh herbs like tarragon or marjoram offer unexpected twists. Keep portions small—a teaspoon of chopped dill or basil makes a big impact. Balance bold flavors by tasting mixtures before applying.
Your kitchen, your rules. Swap ingredients based on mood or pantry stock. The core method remains unchanged, letting creativity shine through every bite.
Avoiding Common Baking Mistakes
Even seasoned home chefs encounter kitchen mishaps. The difference between success and frustration often lies in avoiding simple errors. Let’s tackle the top culprits that sabotage perfectly cooked fish and how to outsmart them.

Preventing Overcooking and Dry Texture
Timing is everything. Set a timer for 2-3 minutes less than your recipe suggests. Fish continues cooking after removal from heat—this carryover effect can mean the difference between moist and chalky results.
Place foil on your sheet pan with the dull side facing up. The shiny surface reflects too much heat, while the matte side promotes even browning. Add a parchment layer atop the foil for non-stick insurance.
| Mistake | Solution | Outcome |
|---|---|---|
| Overbaking | Check at 10-minute mark | Juicy center |
| Uneven spacing | Leave 1″ between fillets | Consistent doneness |
| Dry surfaces | Brush oil before seasoning | Crisp exterior |
Position fillets skin-side down on the prepared sheet pan. This protects delicate flesh from direct heat. For extra moisture, tent loosely with additional foil during the first half of cooking.
Remember: Your oven lies. Use an instant-read thermometer to verify doneness. Pull fillets at 120°F—they’ll reach 125°F while resting. These adjustments transform anxiety into confidence with every bite.
Storage and Reheating Techniques
Leftovers deserve the same care as fresh-cooked meals. Proper handling ensures your creation stays juicy and safe for later enjoyment. Let’s explore smart strategies that maintain quality from fridge to plate.
Best Practices for Keeping Salmon Moist
Transfer cooled portions to an airtight container within two hours of cooking. This prevents dryness and blocks fridge odors. Layer parchment paper between pieces if stacking—direct contact causes moisture loss.
For reheating, gentle heat is key. Preheat your oven to 275°F. Place fillets on foil-lined sheet pans with a teaspoon of water or broth. Cover loosely with another foil layer to trap steam. Warm for 10-15 minutes until heated through.
| Method | Time | Moisture Tip |
|---|---|---|
| Oven | 10-15 min | Add liquid base |
| Stovetop | 5-8 min | Use butter pat |
| Microwave | 20-sec bursts | Damp paper towel |
Stovetop options work well for single servings. Heat a non-stick skillet on low. Add a splash of water and a butter slice before placing fillets flesh-side down. Cover immediately to create a steamy environment.
- Refrigerate in airtight container up to 3 days
- Freeze portions wrapped in foil + plastic for 2 months
- Check internal temp reaches 165°F when reheating
Revive herbs by sprinkling fresh chopped parsley or dill after warming. A squeeze of lemon brightens flavors lost during storage. With these techniques, your next-day meal rivals the original.
Conclusion
Mastering this kitchen staple transforms weeknight dinners into memorable experiences. Your journey to flaky, tender results boils down to three essentials: quality ingredients, precise temperature control, and smart prep techniques. With fresh fillets and basic pantry staples, you’re minutes away from a restaurant-worthy meal.
Remember these keys: Preheat your oven properly, use a reliable thermometer, and let the fish rest. The right tools—like heavy-duty foil and a sturdy pan—ensure even cooking without sticking. Patting fillets dry and seasoning generously create that golden crust everyone craves.
Feel empowered to play with flavors. Swap lemon slices for orange wedges, or mix rosemary into melted butter for earthy notes. Each variation keeps dinner exciting while using the same foolproof method.
Hungry for more? Bookmark this guide for quick reference. Whether hosting friends or fueling busy days, your new skills guarantee succulent salmon recipes every time. Fire up that oven—your next masterpiece awaits.
FAQ
Can I substitute olive oil with another fat?
What tools are essential for baking salmon?
How do I adjust baking time for thicker fillets?
Can I prepare salmon ahead of time?
How do I know when salmon is fully cooked?
What’s the best way to reheat leftovers?
Can I add vegetables to the same pan?
Why does my salmon stick to the pan?
Is it better to bake salmon skin-on or skin-off?
How long can I store baked salmon in the fridge?
Serve your salmon with a side of sesame rice or roasted sweet potatoes, then add a splash of coconut aminos or a spoonful of tangy mango salsa for a tropical twist. Looking to expand your healthy recipe collection? Browse our best Gluten-Free Desserts for Busy Professionals to satisfy your sweet tooth, or cozy up with one of our flavorful Dairy-Free & Gluten-Free Soup Ideas. For quick dinners that won’t sacrifice nutrition, check out our curated Healthy Weeknight Meals. Want to make seafood smarter? Visit Seafood Watch for trusted sustainability tips.