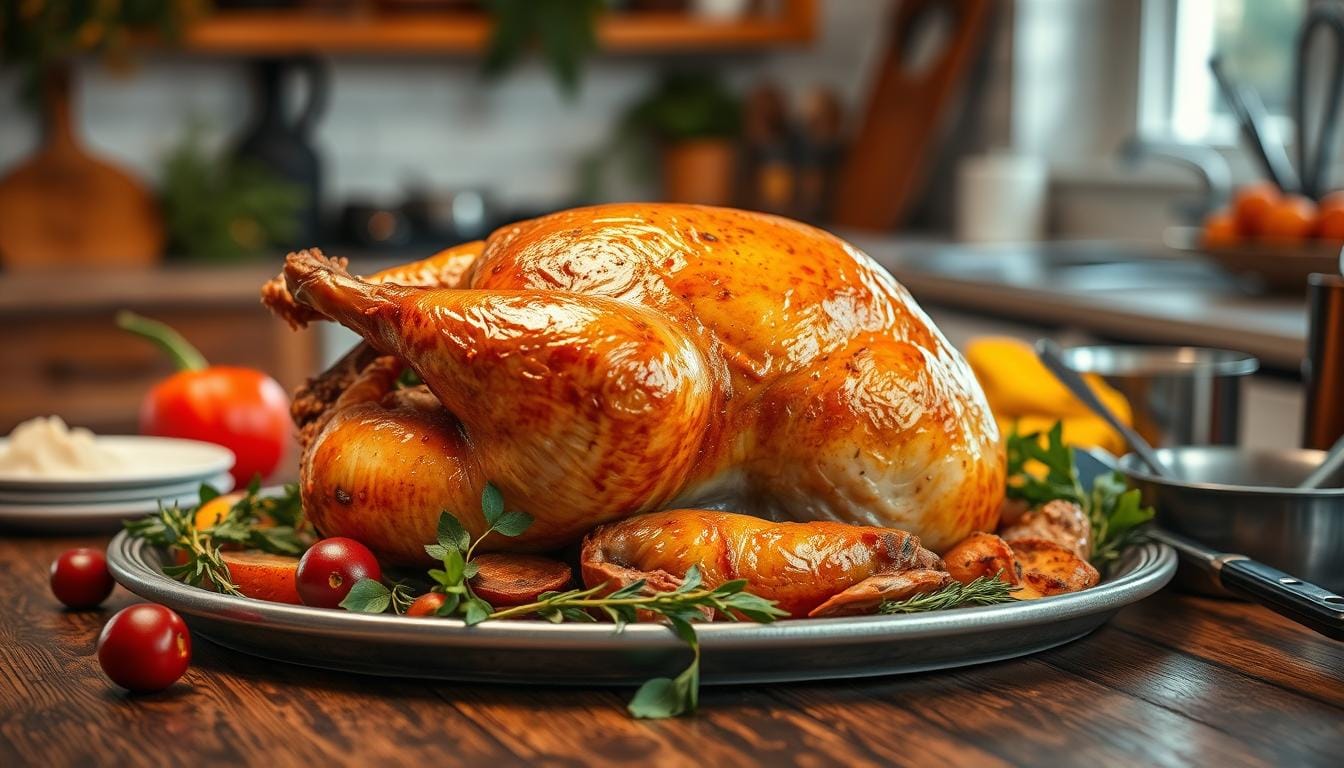
Roasting a turkey might seem scary, but it’s easy with the right tips. About 88% of Americans love turkey on Thanksgiving. It’s a tradition that brings families together.
Learning how to roast a turkey is simple. Up to 25% of home cooks feel nervous about it. But with some prep and knowledge, you can make a turkey that wows your guests.
Success starts with planning. From picking the right turkey to knowing cooking times, each step is key. A 15-pound turkey takes about 3.5 hours to roast at 325°F. It’s about 14 minutes per pound.
Table of Contents
Key Takeaways
- Plan your turkey preparation at least 3-4 days in advance
- Choose a turkey size based on your guest count
- Allow proper thawing time in the refrigerator
- Use a meat thermometer to ensure correct internal temperature
- Rest the turkey for 30-60 minutes after cooking
Essential Turkey Preparation Guide
Getting your roast turkey just right starts with planning and the right steps. Before you start cooking your turkey, you need to know a few key steps. These steps can make or break your holiday meal.
Picking the right turkey is key for a great roast. The turkey’s size depends on how many guests you’re hosting.
Choosing the Right Size Turkey
Here’s a guide for choosing the right turkey size:
- 6-8 people: Select a 10-12 pound turkey
- 9-12 people: Choose a 14-18 pound turkey
- 12-16 people: Opt for an 18-24 pound turkey
Pro tip: Plan for about 1½ pounds per person to ensure everyone gets enough, with some delicious leftovers.
Thawing Instructions
| Turkey Weight | Refrigerator Thawing Time |
|---|---|
| 10-14 pounds | 3-4 days |
| 15-18 pounds | 4-5 days |
| 19-24 pounds | 5-6 days |
“Always thaw your turkey in the refrigerator, never at room temperature to prevent bacterial growth.”
Required Kitchen Equipment
To cook your turkey perfectly, you’ll need these tools:
- Large roasting pan
- Meat thermometer
- Sharp carving knife
- Aluminum foil
- Basting brush
- Cutting board
Proper preparation is the key to a delicious, perfectly roasted turkey. It will impress your guests and make your holiday memorable.
How to Roast a Turkey: The Complete Process
Mastering turkey cooking instructions needs precision and patience. Your perfect roasted turkey begins with careful preparation and strategic cooking techniques.
Start by preheating your oven to 325°F, the best temperature for even cooking. Place the turkey breast side up on a sturdy roasting rack. This is crucial.
“The secret to a perfect roasted turkey is understanding temperature control and timing.” – Professional Chef
Essential Roasting Steps
- Remove turkey from refrigerator 1 hour before cooking
- Pat the turkey dry with paper towels
- Tie legs together with kitchen twine
- Season generously with salt and pepper
- Cover breast with aluminum foil to prevent over-browning
Cooking times depend on turkey weight. A general rule is about 15 minutes per pound at 325°F.
| Turkey Weight | Estimated Cooking Time |
|---|---|
| 8-12 pounds | 2 3/4 to 3 hours |
| 12-14 pounds | 3 to 3 3/4 hours |
| 14-18 pounds | 3 3/4 to 4 1/4 hours |
Keep a close eye on your turkey. Use a meat thermometer to check the internal temperature. It should reach 165°F in the thickest part of the thigh before removing from the oven.
Understanding Brining Techniques
Brining is a game-changer for turkey roasting. It turns an ordinary turkey into a delicious centerpiece. These techniques make your holiday meal unforgettable by adding moisture and flavor.
Brining offers two main methods: wet and dry brining. Each method has its own benefits. They can greatly improve your turkey’s taste and texture.
Wet Brining Method
Wet brining means soaking your turkey in a saltwater solution. Here’s how to do it:
- Use 1 gallon of cold water per 5 pounds of turkey
- Add 1 cup of kosher salt per gallon of water
- Optional: Include 1/2 cup of sugar to balance saltiness
- Brine for 24 to 72 hours, depending on turkey size
Dry Brining Alternative
Dry brining is simpler. It focuses flavor on the turkey’s skin. Here’s how to do it:
- Use 1 tablespoon of kosher salt per 5 pounds of turkey
- Sprinkle salt evenly over the entire bird
- Refrigerate uncovered for 24-48 hours
- Pat dry before roasting for crispy skin
Brining Timeline
| Brining Method | Duration | Temperature |
|---|---|---|
| Wet Brining | 12-24 hours | 35-40°F |
| Dry Brining | 24-48 hours | 40°F or below |
“Brining is the secret weapon for a juicy, flavorful turkey that will have your guests asking for seconds.” – Professional Chef
Remember, the key to successful brining is keeping safe temperatures and following precise measurements. Your turkey will thank you with incredible moisture and rich, enhanced flavors.
Perfect Temperature and Timing Guidelines
Mastering the roast turkey temperature is key for a delicious holiday meal. The secret to a perfect turkey is knowing the exact cooking temperatures and timing. Your turkey’s success depends on careful temperature control and monitoring.
Start by roasting the turkey at 425°F for the first 30-45 minutes. Then, lower the oven to 350°F for the rest of the cooking time. This method ensures a crispy skin and even internal cooking.
“The difference between a good and great turkey is all in the temperature control.” – Professional Chef
Cooking Time and Temperature Guidelines
- Recommended roasting temperature: 350°F
- Cooking time: Approximately 13-15 minutes per pound
- Internal temperature goal: 165°F
Turkey Size Cooking Times
| Turkey Weight | Estimated Cooking Time |
|---|---|
| 10-12 lbs | 2¼ – 2¾ hours |
| 12-14 lbs | 2¾ – 3 hours |
| 15-18 lbs | 3¼ – 4 hours |
Always use a reliable meat thermometer to check the turkey’s internal temperature. Remove the turkey from the oven when it reaches 155°F. The temperature will rise more during resting. Let the turkey rest for at least 30 minutes before carving to allow juices to redistribute.
Pro tip: For the most accurate results, insert the thermometer into the thickest part of the thigh without touching the bone.
Creating the Perfect Turkey Seasoning
Turning your turkey into a showstopper starts with the right seasoning blend. Mastering seasoning is key to making your turkey unforgettable. It’s what takes your holiday turkey from good to great.
Understanding the power of a great spice mix is crucial. Let’s explore how to make a seasoning blend that will wow your guests.
Herb and Butter Mixture
A delicious turkey comes from a special herb and butter mix. Here’s a seasoning mix that will cover all your flavor bases:
- 2 tablespoons kosher salt
- 1 tablespoon garlic powder
- 1 tablespoon lemon pepper
- 1 tablespoon light brown sugar
- 1 tablespoon paprika
- 2 teaspoons ground sage
- 2 teaspoons onion powder
- 2 teaspoons ground thyme
- 1 teaspoon cayenne pepper (optional)
Cavity Stuffing Options
Stuffing the turkey’s cavity with aromatic ingredients boosts its flavor. Try these classic stuffing ideas:
- Whole garlic cloves
- Fresh herb sprigs (thyme, rosemary)
- Quartered lemons
- Sliced onions
- Apple or orange wedges
External Seasoning Tips
For the best flavor and crispy skin, follow these tips:
- Apply seasoning 12 hours before cooking
- Use 1 1/2 tablespoons of spice rub per 3 pounds of turkey
- Gently work seasoning under the skin
- Use clarified butter for high-temperature roasting
| Turkey Weight | Seasoning Amount | Preparation Time |
|---|---|---|
| 10-14 pounds | 4 1/2 tablespoons | 3 minutes |
| 20 pounds | 8 tablespoons (1/2 cup) | 3 minutes |
Pro tip: Brown sugar helps create a beautiful caramelized crust on your turkey skin!
Roasting Pan Setup and Preparation

Choosing the right roasting pan is key for your turkey. Start by picking a pan that’s big enough and sturdy. For turkeys up to 20 pounds, use a pan that’s at least 16 inches long and 4 inches deep.
Think about these important things when setting up your pan:
- Pan size that fits your turkey’s weight
- A sturdy roasting rack for air to flow
- Room for aromatics and liquid
“A well-prepared roasting pan is the foundation of a perfectly cooked turkey”
If you don’t have a roasting rack, make one from aluminum foil. Roll the foil into rings that lift the turkey. This helps the heat cook it evenly.
| Turkey Weight | Recommended Pan Size |
|---|---|
| Up to 20 pounds | 16-inch pan |
| Over 20 pounds | 18-inch pan |
Pro tip: Line the bottom of your pan with onions, carrots, and celery. They add flavor and keep the turkey from sticking.
Essential Roasting Techniques and Tips
Learning how to roast a turkey can make any meal special. Whether it’s for a holiday or a cozy dinner, knowing the right steps is key. It will help you make a turkey that wows your guests.
Roasting a turkey well needs focus on a few important things. You need to be precise and know what you’re doing. This way, you get a turkey that’s juicy, golden, and full of flavor.
Basting Guidelines for Maximum Flavor
Basting is key to a juicy turkey. Here are some tips from the experts:
- Baste the turkey every 30 minutes with pan drippings
- Use a bulb baster or large spoon to spread juices well
- Open the oven quickly to avoid losing heat
Temperature Control Methods
Keeping your oven at the right temperature is crucial. Start by heating it to 450°F for the first 45 minutes. This crisps the skin. Then, lower it to 325°F for the rest of the cooking time.
“The secret to a perfect roasted turkey is temperature management and patience.” – Culinary Expert
Browning Techniques for Golden Skin
To get that golden-brown skin, you need to cook smart. Try these methods:
- Use aluminum foil to protect delicate spots from burning
- Brush the turkey with melted butter for better browning
- Take off the foil in the last hour to crisp the skin
Professional chefs say to watch the internal temperature. It should hit 160°F before you take the turkey out. Remember, it will keep getting hotter while it rests. This ensures your turkey is always perfect.
Testing for Doneness

Figuring out when your roast turkey is done needs precision and the right tools. The secret to a great turkey is knowing the exact temperature. This ensures it’s both safe and tasty.
“A perfectly cooked turkey is a matter of temperature, not just time.” – Professional Chef
To make sure your turkey is cooked right, you’ll need a digital thermometer. Here’s how to check:
- Insert the thermometer into the thickest part of the breast
- Check the inner thigh area near the bone
- Avoid touching bone or cartilage for accurate readings
- Look for an internal temperature of 165°F
Experts say to check the temperature in different spots. Don’t trust those pop-out thermometers that come with turkeys. They’re not reliable. A digital thermometer gives the most accurate reading.
| Turkey Part | Ideal Temperature | Safe Zone |
|---|---|---|
| Breast | 160°F | 150-165°F |
| Thigh | 170°F | 165-175°F |
Remember, carryover cooking means your turkey will keep heating up after you take it out of the oven. Take it out when it’s about 5-10 degrees below the target. This prevents it from getting too dry.
Pro tip: Start checking the temperature every 10 minutes when your turkey is about 75% done cooking.
Resting and Carving Instructions
After you’ve roasted your turkey, the last steps are key to a perfect meal. Resting and carving right can turn a good turkey into an amazing one.
Your hard work in roasting the turkey leads to these important moments. The resting time lets the juices spread evenly. This makes each slice juicy and full of flavor.
Proper Resting Time
When your turkey comes out of the oven, patience is key. Here are the turkey roasting tips for resting:
- Remove turkey from oven and cover loosely with aluminum foil
- Let rest for 20-30 minutes before carving
- Keep turkey in a warm area to maintain temperature
- Avoid cutting too soon to prevent losing precious juices
Basic Carving Steps
Carving your turkey might seem hard, but it’s simple with these steps. You’ll have a beautifully sliced turkey:
- Place turkey on a large cutting board
- Remove leg and thigh sections first
- Slice breast meat against the grain
- Separate wing sections carefully
“A well-rested and carefully carved turkey is the hallmark of a true culinary artist.” – Professional Chef
By following these turkey roasting tips, you’ll make your holiday meal unforgettable. It will impress your family and friends.
Turkey Drippings and Gravy Making
Turning your roast turkey into a full meal starts with making great gravy. The key to a fantastic gravy is catching every flavorful drop from the roasting pan. Saving those rich drippings is key when cooking a turkey. It helps make a delicious sauce that makes your whole meal better.
Here’s how to collect drippings:
- Remove the turkey from the roasting pan carefully
- Tilt the pan to gather all liquid gold
- Strain out any solid pieces or burnt bits
- Let the drippings settle to separate fat from juice
For making gravy, you’ll need:
| Tool | Purpose |
|---|---|
| Fat separator | Remove excess turkey fat |
| Whisk | Create smooth gravy consistency |
| Saucepan | Cook and reduce gravy |
Pro tip: If you’re short on drippings, use chicken stock for extra flavor. Start by whisking flour into melted butter. Then, slowly add warm drippings or stock while stirring to avoid lumps.
“The perfect gravy can transform a good roast turkey into an unforgettable feast.” – Professional Chef
Want to make gravy ahead of time? Use turkey or chicken stock. Just make a roux, then add warm stock and season to taste.
Conclusion
Learning to roast a turkey can make your holiday meal special. By following this guide, you’ll find it’s easier than you think. The secret is patience, precision, and knowing the right techniques.
Roasting a turkey is more than cooking a meal. It’s about making memories. Focus on key steps like choosing the right turkey size, thawing it right, and keeping the temperature just right. These steps help make a juicy, tasty turkey that will wow your guests.
Roasting turkeys gets better with practice. Even if your first try isn’t perfect, don’t worry. Each time, you’ll get better. The most important thing is enjoying a great meal with your loved ones. With the tips from this guide, you’re ready to make a fantastic turkey that will be the star of any celebration.
Your turkey roasting journey begins today. Be open to learning, trust yourself, and enjoy the delicious results of your cooking.
FAQ
How long does it take to thaw a frozen turkey?
What’s the recommended internal temperature for a fully cooked turkey?
Should I brine my turkey before roasting?
How often should I baste the turkey?
How do I prevent my turkey from drying out?
Can I stuff the turkey before roasting?
How much turkey should I prepare per person?
What’s the best way to carve a turkey?
Source Links
- How to Roast A Turkey the Easy Way – Fearless Fresh – https://fearlessfresh.com/how-to-roast-a-turkey/
- Best Roasted Turkey We’ve Ever Made – https://www.inspiredtaste.net/63746/roast-turkey/
- My Mom’s Roast Turkey Always Delivers – https://www.simplyrecipes.com/recipes/moms_roast_turkey/
- Ree’s Roasted Thanksgiving Turkey Is the Best You’ll Ever Try – https://www.thepioneerwoman.com/food-cooking/recipes/a11883/roasted-thanksgiving-turkey/
- Thanksgiving Turkey – https://www.wellplated.com/how-to-cook-a-turkey/
- How to Cook and Prepare a Turkey – https://www.bettycrocker.com/how-to/tipslibrary/cooking-tips/how-to-cook-a-turkey
- Juicy Thanksgiving Turkey – https://www.allrecipes.com/recipe/166160/juicy-thanksgiving-turkey/
- Martha’s Cheesecloth Turkey Recipe Has Been Her Thanksgiving Go-to for Years – https://www.marthastewart.com/353184/perfect-roast-turkey
- 5 Simple Rules for Perfect Turkey You Wish You Knew Earlier – https://www.thespruceeats.com/basics-of-cooking-turkey-101703
- The Ultimate Guide To Brining Turkey – Tasting Table – https://www.tastingtable.com/1723149/ultimate-guide-brining-turkey/
- Ultimate Guide: How to Brine a Turkey – https://www.pillsbury.com/how-to/prep-method/brine-a-turkey
- How Long to Cook a Turkey – https://www.allrecipes.com/article/turkey-cooking-time-guide/
- Here’s What Temperature to Cook a Turkey So It Stays Moist – https://www.realsimple.com/what-temperature-to-cook-a-turkey-6822735
- Ree’s Turkey Seasoning Will Take Your Bird from Good to Great – https://www.thepioneerwoman.com/food-cooking/recipes/a62953539/turkey-seasoning-recipe/
- Homemade Turkey Rub Recipe – https://www.savoryexperiments.com/homemade-turkey-rub-recipe/
- I Tested This Thanksgiving Roast Turkey Recipe 7 Times So You Can Get It Perfect In 1 – https://www.delish.com/cooking/recipe-ideas/a62876155/best-roasted-turkey-recipe/
- How to Roast a Turkey – https://www.jocooks.com/recipes/roast-turkey-2/
- How to Cook a Turkey – https://preppykitchen.com/how-to-cook-a-turkey/
- How To Roast Turkey Perfectly – https://cookthestory.com/how-to-roast-turkey-perfectly/
- How long to cook a turkey so you don’t ruin Thanksgiving – https://www.today.com/food/thanksgiving-guide/how-long-to-cook-turkey-rcna51684
- Easy Thanksgiving Turkey Recipe – https://downshiftology.com/recipes/thanksgiving-turkey-recipe/
- How to Roast the Perfect Thanksgiving Turkey – https://madeincookware.com/blogs/how-to-roast-a-turkey
- Step by Step Instructions for Cooking a Thanksgiving Turkey – https://thekittchen.com/step-by-step-instructions-for-cooking-a-thanksgiving-turkey/
- How to Carve a Turkey – Tastes Better From Scratch – https://tastesbetterfromscratch.com/how-to-carve-a-turkey/
- Easy, No-Fuss Thanksgiving Turkey – Tastes Better From Scratch – https://tastesbetterfromscratch.com/easy-no-fuss-thanksgiving-turkey/
- The Best Simple Roast Turkey With Gravy Recipe – https://www.seriouseats.com/the-best-simple-roast-turkey-gravy-recipe
- How to Cook a Turkey Perfectly – https://food52.com/blog/24434-how-to-cook-a-turkey?srsltid=AfmBOoqPZxnBtRFCd9H3eIHZJWOhorFIrJ-e5T1vOwN4DnLxTVtDRl4M
I’m really impressed with your writing skills and also with the format for your weblog.
Is this a paid theme or did you customize it your
self? Either way stay up the excellent quality writing, it’s rare to peer
a nice blog like this one nowadays. Snipfeed!
Can you be more specific about the content of your article? After reading it, I still have some doubts. Hope you can help me.
Thanks for sharing. I read many of your blog posts, cool, your blog is very good.
Thanks for sharing. I read many of your blog posts, cool, your blog is very good.
Can you be more specific about the content of your article? After reading it, I still have some doubts. Hope you can help me.
Thank you for your sharing. I am worried that I lack creative ideas. It is your article that makes me full of hope. Thank you. But, I have a question, can you help me?
188v là nhà cái global, được thành lập từ 2008 và máy chủ 188v chúng tôi đang được đặt tai Cambridge (Anh). TONY12-26
Khám phá thế giới giải trí không giới hạn tại 188V . Từ slot cổ điển đến video slots hiện đại, tất cả đều có tỷ lệ hoàn trả cực cao. TONY03-09
The atmosphere of this terpene fuse – https://terpenewarehouse.com/collections/citrus-terpenes is really clean and ingenuous, not too tireless but still clear-cut in the most way. It blends smoothly and adds a much bettor flavor study without overpowering the aggregate else. Flush a small amount makes a difference, which says a lot with reference to the quality. The packaging was solid, shipping was faithful, and the unimpaired circumstance felt reliable. Indeed sound produce and one I’d providentially uncalled-for again.
This was a really real https://www.hipuffy.com/collections/relax-gummies . The hardware felt honest, the pour was cagey flatten, and there weren’t any annoying clogging issues, which makes a gargantuan difference. The flavor stayed bathe a exhaust and enjoyable without starting to cultivation burnt too with dispatch, and the transport itself looked splendidly made morality alibi of the box. Everything about it felt consonant and serene to use. For anyone looking exchange for a straightforward tote with considerate flavor and dependable mat‚riel, this identical unequivocally checks the boxes.
These indica gummies were exactly the amicable of product that works wonderfully for a nighttime routine. The flavor was jam-packed, not too chocolate, and there wasn’t any strange hemp-heavy savour hanging wide afterward. They also satisfy perfectly as put one’s feet up gummies because the overall vibe felt calm and easygoing. As anyone browsing sleep gummies, this thoughtful of artefact makes reason too because it pairs really nicely with a quietness evening, a big, or upstanding slowing things down at the end of the day.
I don’t think the title of your article matches the content lol. Just kidding, mainly because I had some doubts after reading the article.
Có rất nhiều lựa chọn thú vị 188v nhà cái TONY05-22
Theo mình thì slot365 apk phù hợp cho ai thích giao diện đơn giản. TONY05-22
Slot nổ hũ tại 888SLOT nổi tiếng “mát tay” – nhiều thành viên đã trúng Jackpot hàng trăm triệu chỉ sau vài vòng quay. TONY06-16
Sau gần 5 năm hoạt động, thương hiệu không chỉ có được vị thế vững chắc trên thị trường mà còn khẳng định đẳng cấp của mình khi sở hữu đầy đủ giấy chứng nhận hợp pháp từ PAGCOR và CEZA. 66B Do vậy, bạn hoàn toàn có thể yên tâm tham gia cá cược thỏa mãn đam mê của mình mà không cần lo ngại về những vấn đề pháp lý khác. TONY06-16